

Orthographic Mapping In French Immersion
Orthographic mapping has recently come into my world and when I tell you it’s been a game changer, I really mean it. It takes a little getting used to and some trial and error but within a few weeks and lots of practice, I noticed a big change in my students’ spelling confidence. While I’ll be talking about it in reference to French, this practice can be used in English too!
What is orthographic mapping?
Orthographic mapping (OM) is the process of connecting the smallest units of sound (phonemes) to their written symbols (graphemes). We are making connections between letters and sounds so that we can recall the spelling, pronunciation and meaning. This is important both in learning to read and write, especially in a second (or third) language.
You’re probably aware of the process of decoding when reading, looking at a written word and using knowledge of letter sounds to sound out the word. OM is the opposite, it’s encoding, which is using the knowledge of sounds to write.
When do I use it?
I use it multiple times per week! I like to use orthographic mapping for new vocabulary words and for weekly words. I do a weekly dictée based on a complex sound of the week. One of the ways that we work on these words is through OM so that we can actually understand how the word is “built” rather than just trying to memorize it. It’s also handy when students are trying to write during independent writing. They are allowed to ask for me to translate a word (not whole sentences!) so if I give them the word, they use their knowledge of OM to help them spell it.
For my grade three students, this is the first year that they get English instruction and this year my group needs a lot of support in phonics land. It can be hard to retrain the brain that “ch” says a different sound in English when we’ve spent years teaching them the French pronunciation. To help them, I’ve been using these same methods with them during some of our English periods too.
My method:
While there are many ways to teach students about OM, this is how we do it in my class. Feel free to adapt it to meet the needs of your students based on their level. I teach my students that there are three steps to breaking down a word: SAY IT - CLAP IT - WRITE IT
Say it:
First thing we need to do is actually say the word and notice how it’s pronounced. This will help us figure out if there are any silent letters. Say the word slowly, being careful to pronounce it properly. What do you notice about the word? What sounds are you making?
Clap it:
Now, we say the word again but this time we clap each SOUND. It’s important to note that a sound (phoneme) is not the same thing as a syllable. This is an important distinction as we will need to be clear where each sound is for when we map it in written form. Below is an example using the word papillon.
Syllables: pa-pill-on (3 claps)
Phonemes: p-a-p-ill-on (5 claps)
Write it:
We are going to map out the word on the chart by writing one sound per box. Remember that a sound can be made up of a single letter or more than one. We need a few materials: mapping chart, pencil, two colours. You can use pencil crayons or markers and it does not matter which two colours you choose. You may want everyone to choose the same colours if you’re doing it as a group to make it easier.
Our code:
pencil = consonants
colour 1 = vowels
colour 2 = complex sounds
two lines under a letter = silent letter
Note: vowels don’t have to be in another colour, you could just make complex sounds the colourful one. I like to get them to notice the vowels so we bring attention with the colours but that’s not necessary.
In our example papillon we clapped 5 times. This tells me that I need to use 5 boxes on the chart.
p (consonant = pencil)
a (vowel = blue)
p (consonant = pencil)
ill (complex sound = yellow)
on (complex sound = yellow)
p a p ill on
Where things can go wrong…and how to help!
Silent letters
So, this is the part that my students struggled with most if they see the word before they have to map it out (which is true for when we do it with dictée words). They naturally want to put one letter per box but that’s not the point of the exercise. This is why clapping is so important, if you clap it properly, it means you should only be using that many boxes on your chart, not more. For students that need a visual support, you can clap and then use tokens to represent sounds so that they don’t add any more on the chart.
I like to call the silent letters ghost letters (les lettres fantômes) and that even though they’re ghosts, they are scared to be alone, they always want to feel safe with a buddy. This reminds them that they need to squeeze that silent letter into the last actual sound.
Another way to make them notice it is to pronounce it exactly the way they wrote it. So if the word is souris and they did s-ou-r-i-s, pronounce it like that, with the s! They’ll immediately tell you it’s ridiculous and can correct their error.
Vowels vs complex sounds
We spend a LOT of time on complex sounds in my class so they’re pretty darn good at recognizing them (plus, we have a massive poster wall of them, so just look up!) but sometimes they can get a bit turned around when these vowels make up a complex sound. For example eau is a complex sound but those are all vowels. So which colour do they use? The vowel colour or the complex sound colour? How many boxes is it? Well, again, that’s why we said it and clapped it. In the word bateau they would say b-a-t-eau. 4 claps, so 4 boxes, that means the eau goes all together. Like in the souris example, if they do it wrong initially, just pronounce it the way they wrote it so if they did b-a-t-e-a-u, say it like that and they’ll notice how silly it sounds and can correct it. If you have a sound chart available to them either on your wall or a personal size, this can be very helpful for students who need reminders.
Check out what it looks like in practice!
This was a week where we focused on the sound ou for our dictée and vocabulary. I don’t have them write the article before the word, but you could do that too. The last box in each row is for them to put all those sounds they stretched out back together again. We don’t use the colours for this box but they do underline the silent letters just to reinforce.
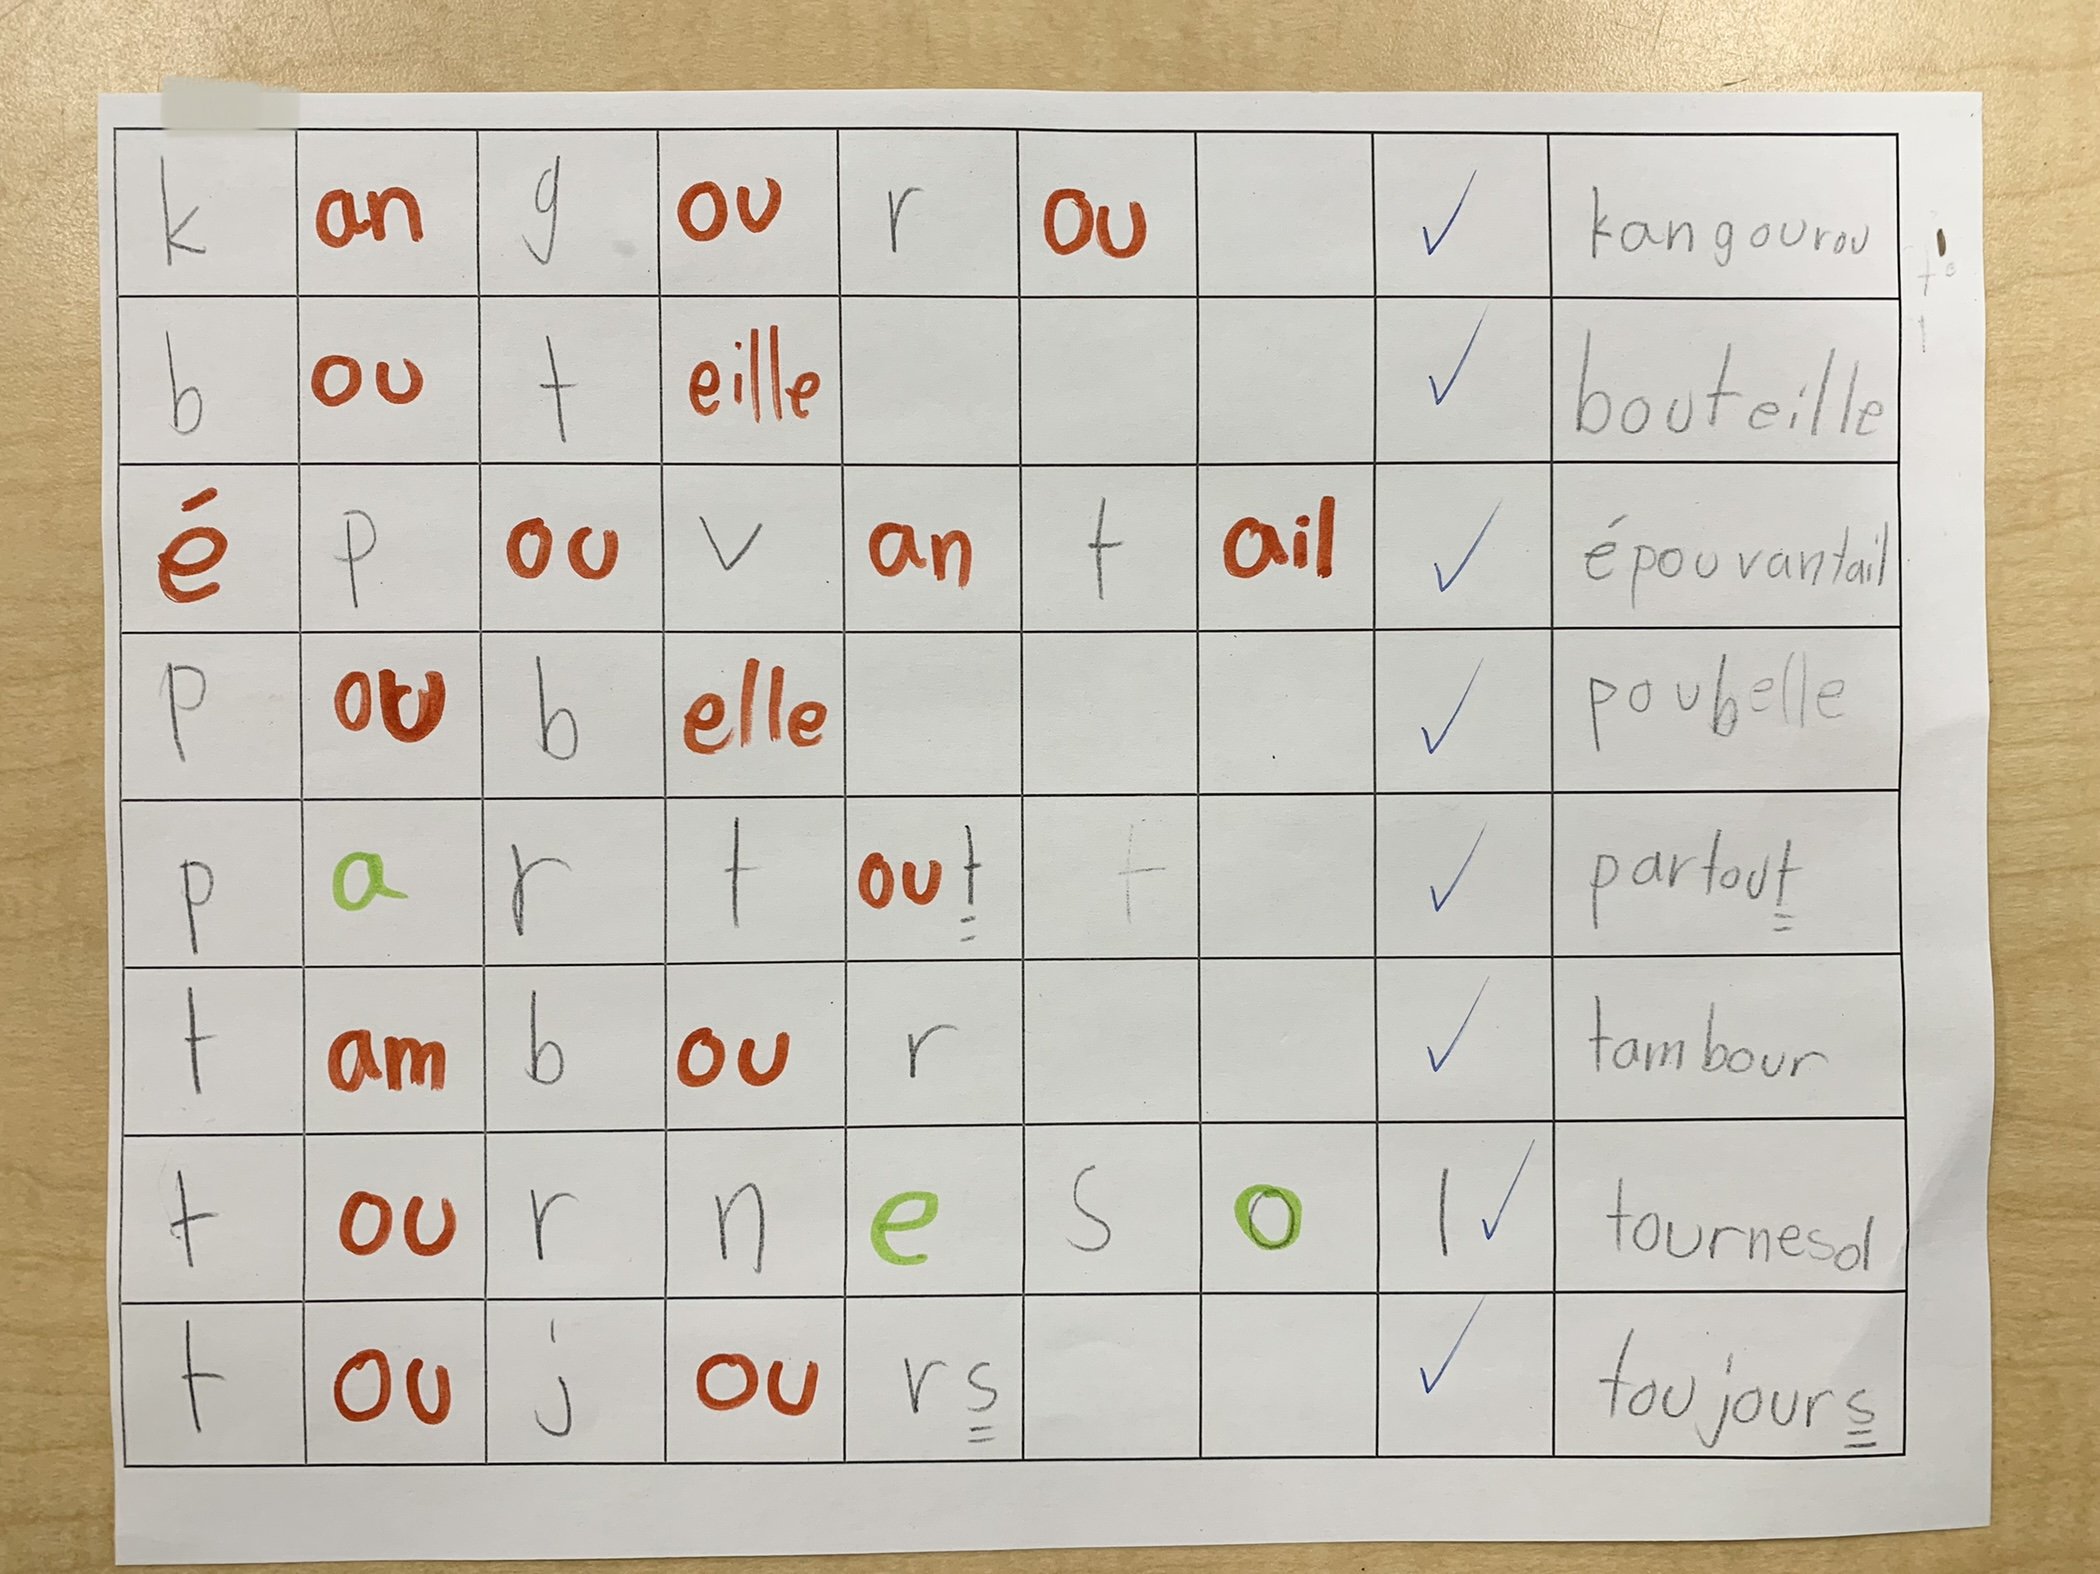
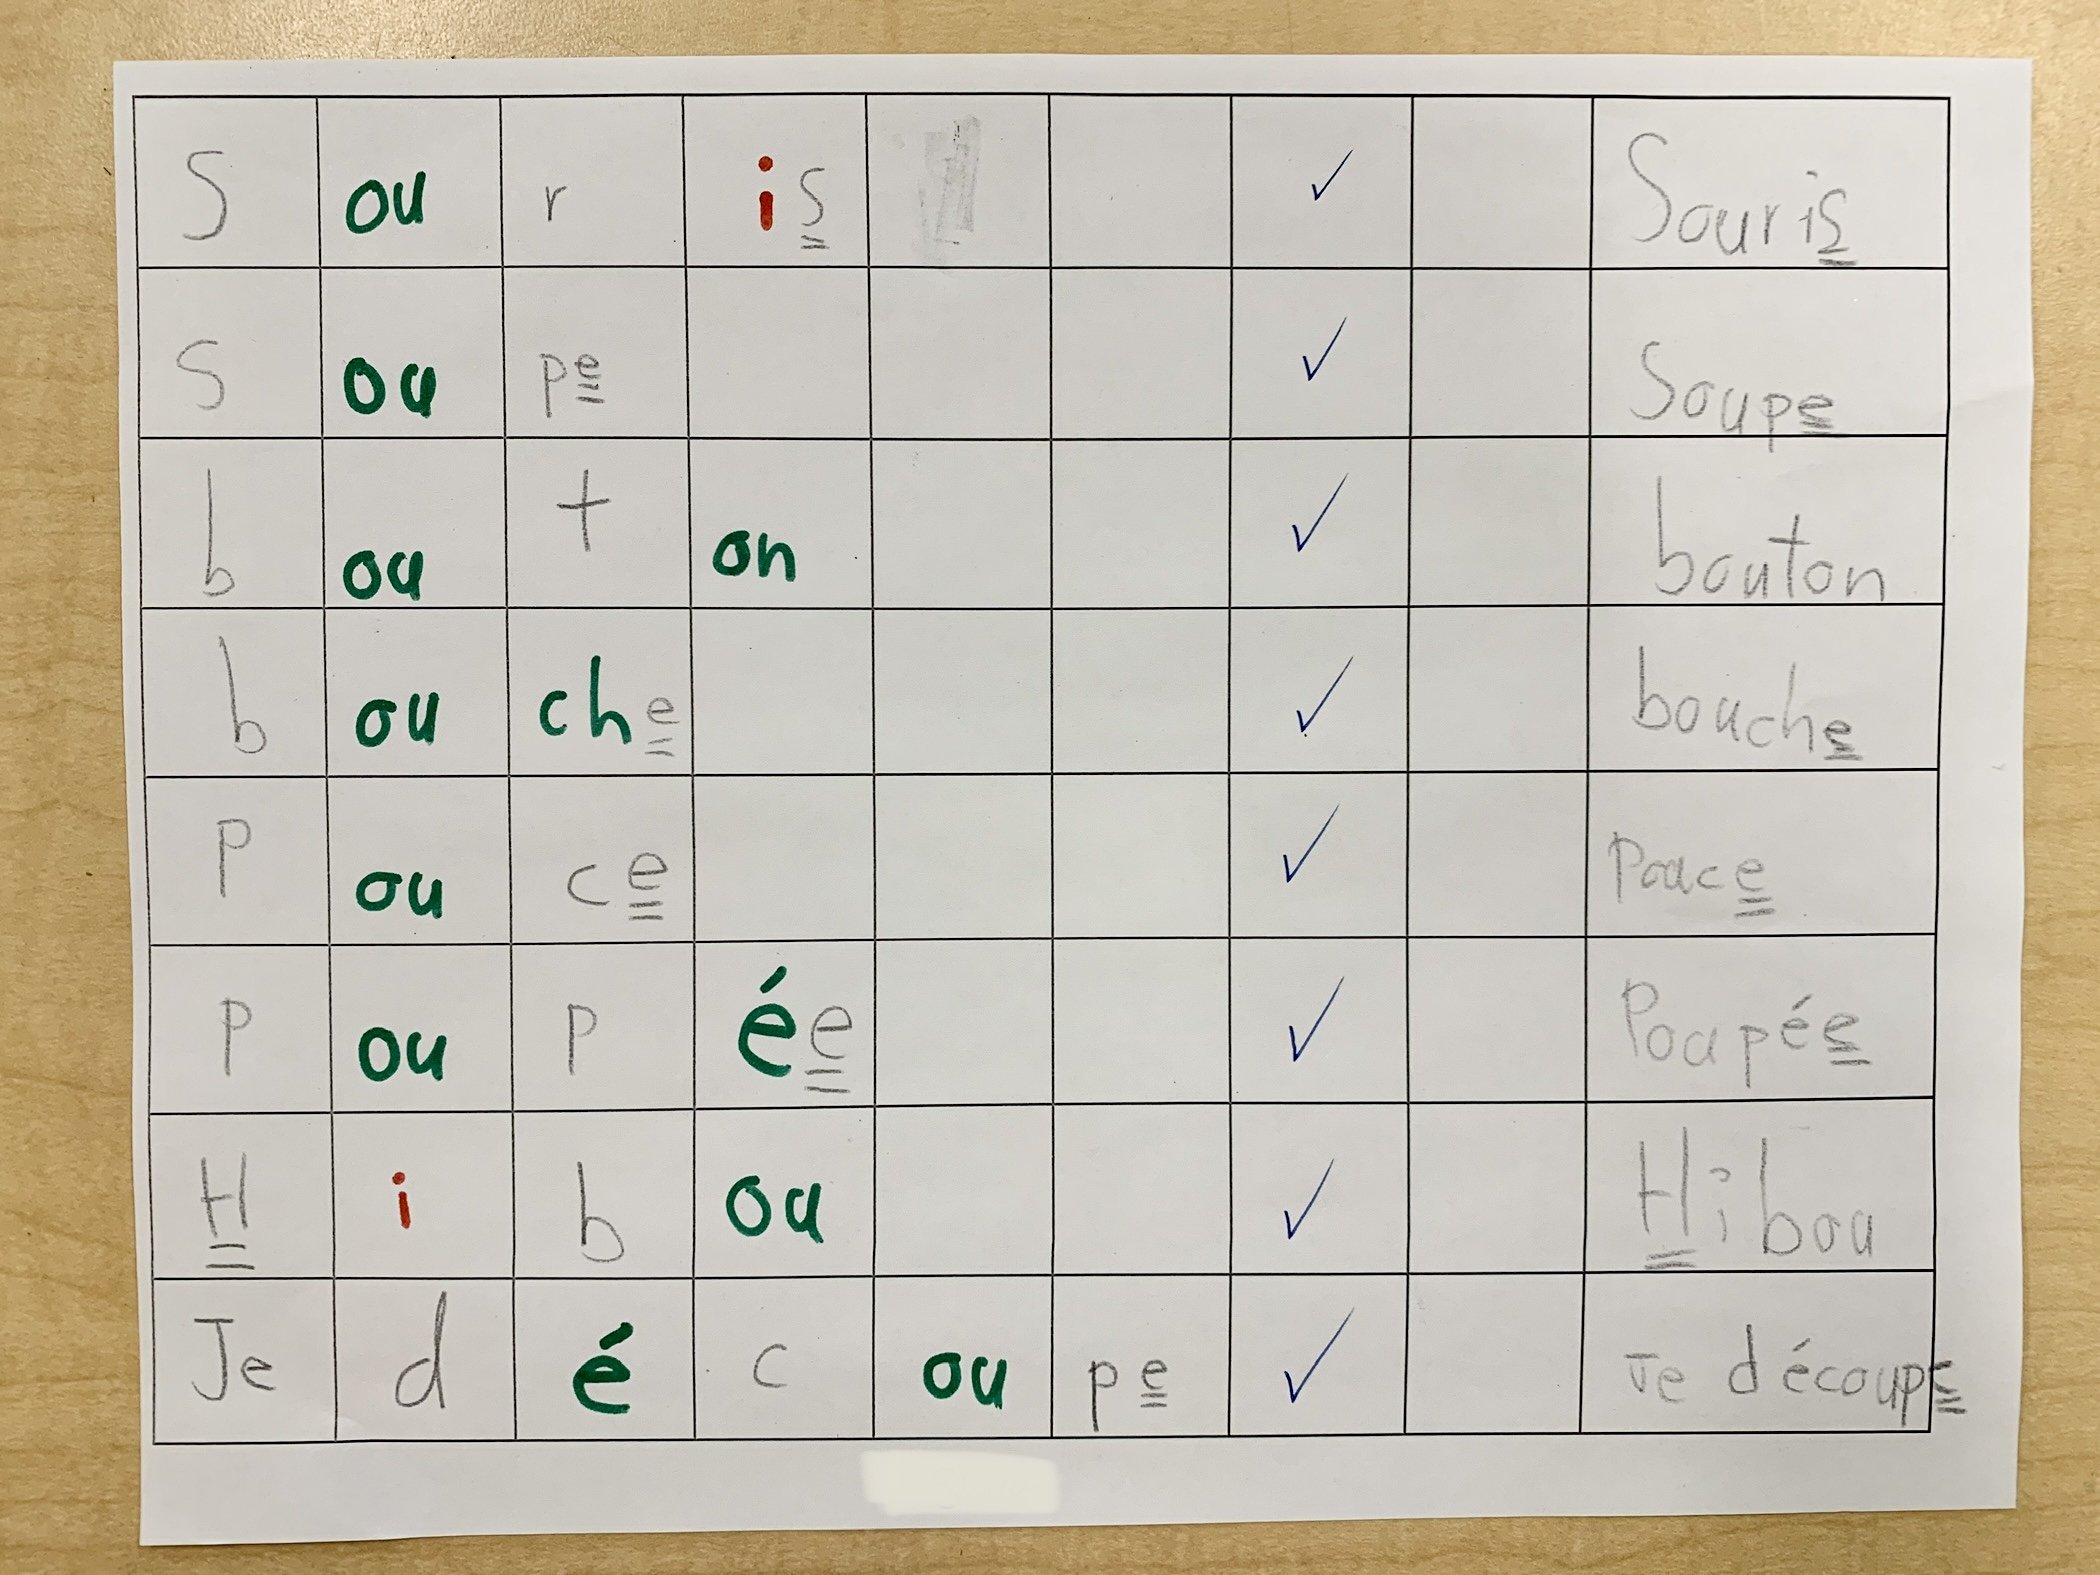
Look, it’s not fancy in the slightest! I have two versions of my mapping charts, one with 6 spaces and one with 8. This is because my dictée groups either have 6 or 8 words. The chart will open in PowerPoint where you can change the number of cells as desired.
If you don’t want to bother with the colours, you could put these sheets into dry erase pouches and have them write with their dry erase marker. Saves a lot of paper that way!